In digital advertising, change is inevitable. In this post we’re going to walk you through everything you should know regarding tracking success with your Facebook Ads in 2021.
We are always experiencing updates in platform interfaces, privacy concerns, and especially tracking attribution. Substantial changes to user tracking taking place across the web have prompted many users to opt out of the tracking that has become commonplace in digital marketing. As a result, using Facebook Ads in combination with Google Analytics (and other tools) is a best practice to ensure that your social ad efforts are on track for success and you have the visibility you need to see how campaigns are performing.
For those who are not yet aware, the recent Apple iOS 14.5 update has limited device-level tracking (referred to as IDFA – Identification for Advertisers). Mobile device users have long been able to opt out of ad personalization using the unique device identifiers relied upon by app developers – however, Apple recently prioritized and simplified the opt-out process for all apps (including Facebook). Recent studies indicate that 96% of Apple device owners have opted out of personalized ad tracking – as a result, the Facebook Pixel can no longer tracking user web or app activity.
For more details on this & a step-by-step guide on how to counter the Apple iOS update you can check out a recent guide by us titled iOS 14 Update, Facebook Ads & Conversion API.
Nonetheless, Facebook advertising is still effective and remains a place to connect your brand with its target audience. Before we get into the thick of it, I want to name the tools/assets we will use for tracking. These include the Facebook Pixel, Standard Events, Conversions API, and UTM Parameters.
Let’s begin with arguably the most important asset attached to your brand’s Facebook Business Manager, the beloved Facebook Pixel.
Facebook Tracking Using The Facebook Pixel
Before moving forward with setting up tracking events on your site, we need to ensure your Facebook pixel is properly implemented onto the site. The pixel is a snippet of code that is implemented in the global <head> tag of your site. It is through this code that we are able to collect and send data at the browser level, back to our Facebook ad accounts.
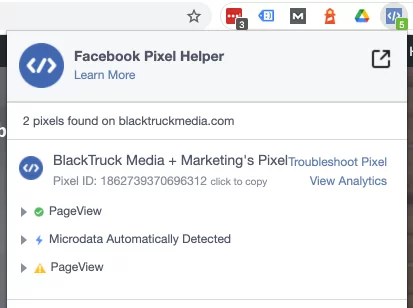
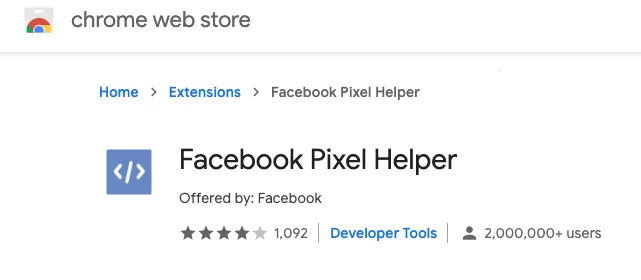
To check if a Facebook Pixel is on your current site we recommend using the Facebook Pixel Helper Chrome Extension. This is a free tool that allows you to simply check if a pixel is found on a domain you are browsing. It also displays events that you have setup so you can double check if they are firing appropriately. Naming conventions are important to keep in mind when setting up or editing your pixel so you can easily identify your pixel.
Once you have finished setting up the Facebook pixel and/or confirming the proper pixel in your Facebook ad account is on your site, we can move onto setting up what events/actions we would like to track.
Creating Standard Events For Facebook Ads
The first step that you must need to identify is what objective do you have? Are you an e-commerce brand that is focused on driving purchases and higher ROAS? Or perhaps a consulting firm with the goal of driving lead form submissions. Whatever venture your brand is involved in, Facebook gives you helpful tools & or code you will need to track meaningful website activity your site visitors are taking.
There are a multitude of website actions we are able to track inside of Facebook Ads. These actions are tracked in the form of “standard events” inside of Facebook. Standard events are created to track meaningful actions website users take on your site. For a complete look at all the standard events advertisers are able to track you can check out the specifications for Facebook Pixel standard events here. Some of the most common events advertisers setup are the following: Add To Cart, Purchase, Contact, Lead, Start Trial, View Content, & Submit Application.
Due to recent updates, we are now only able to track and optimize ad delivery of up to eight standard events. While yes, we are now limited to only eight events, this is not seen as major concern for most. Reason being is many brands and websites do not have more than eight meaningful website actions to track.
Facebook offers two methods to set up standard events across your site. This can be done using the “Event Setup Tool” or manually placing event code to trigger on certain actions such as a button click, landing page view, form fill, product purchase, etc. Luckily, Google Tag Manager exists for marketers who do not have strong web development skills when choosing the manual route (which is recommended!).
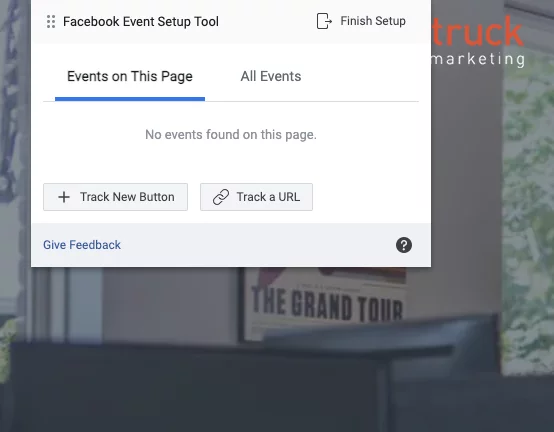
Event Setup Tool
The event setup tool can be found inside of Events Manager while logged into Business Manager. You are going to navigate to “Add Events” and then select “From The Pixel”. Using this method will seamlessly take you to the website you would like to track events on.
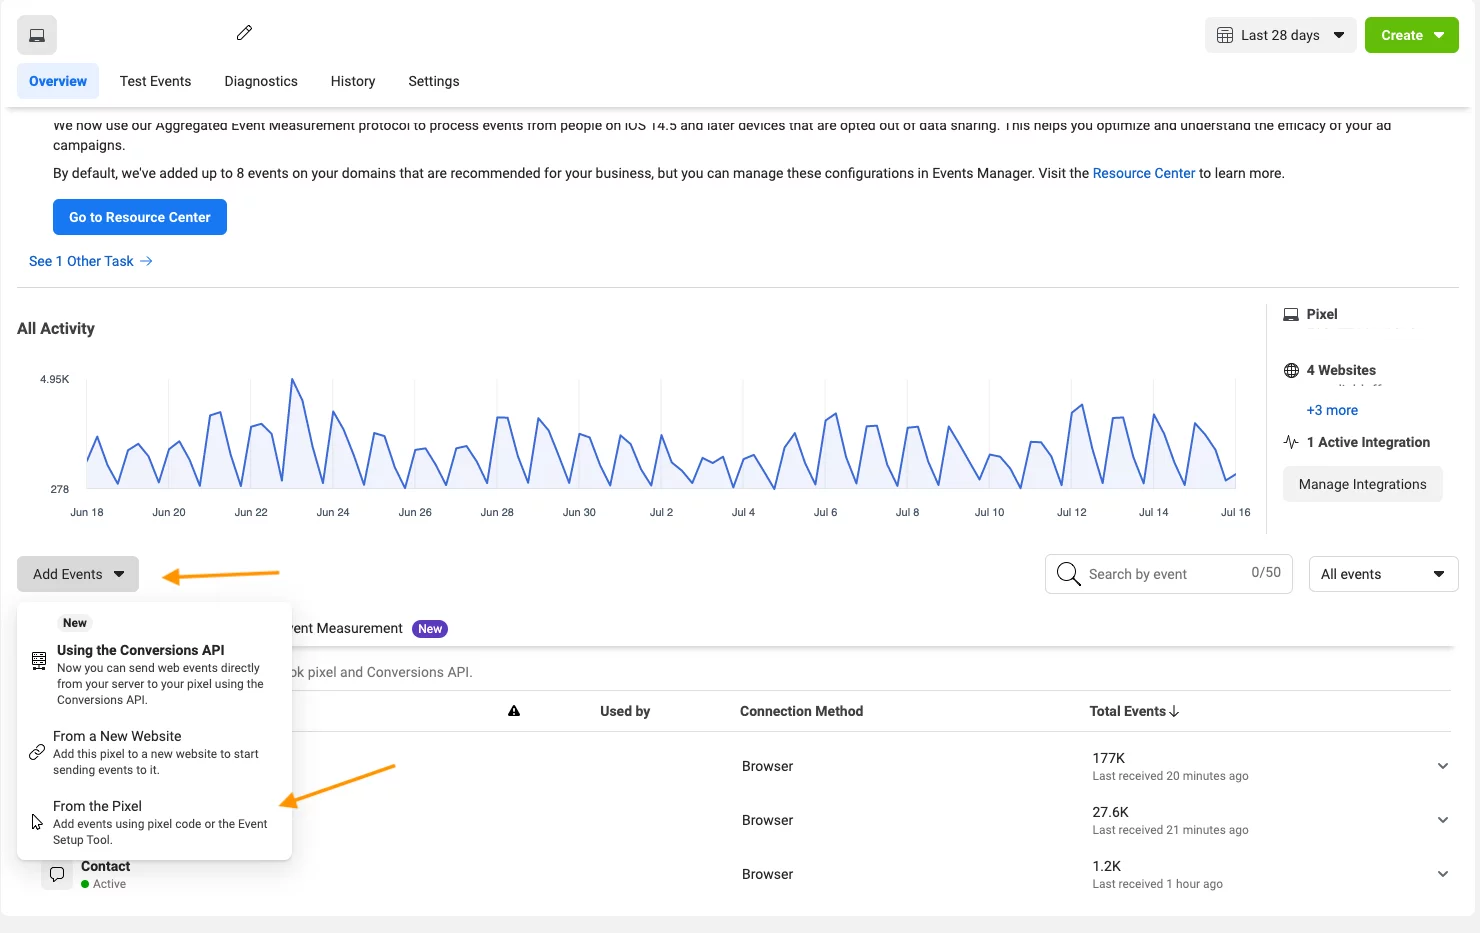
You are given options to either “Track New Button” or “Track a URL”. While this tool is very convenient, it does have limitations on how granular you can track certain events. Especially for E-commerce websites with varying checkout processes, products, product values, etc. With that said, we recommend using this tool for tracking contact form submissions that have a thank you page tied to a successful form submission using the “Track a URL” option.
Manually Install Facebook Events Using Code
The other method of setting up tracking events is to set them up manually by either diving into your website code or using Google Tag Manager. Our team regularly relies on Tag Manager for setting up these standard events as it is often quick, simple, and accurate. Facebook gives you the necessary tracking code to implement on your site here.
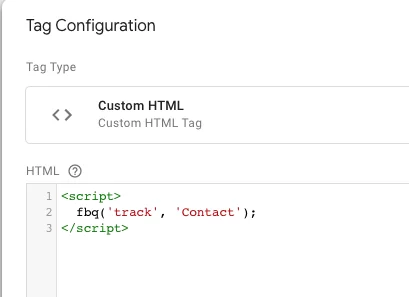
In Tag Manager you are going to want to create a new ‘Custom HTML’ tag and implement the code snippet based on the desired event you want to track. For this example we are going to using set up a Contact standard event. Below you will see what this code snippet should look like inside of Tag Manager.
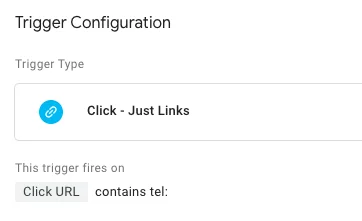
Once you have your tag configured it’s time to associate this tag with a proper trigger to fire this tag and event. For the contact standard event we suggest using a phone call and or contact form trigger. Whatever areas on your site where people meaningfully choose to contact your brand is what should be included for the ‘Contact’ event. The example below show’s what a phone call trigger can look like inside of Tag Manager.
Conversions API
Conversions API (CAPI) is a Facebook Business Tool that lets you share key web events or customer actions, directly from your server to Facebook’s. The API works with the Facebook Pixel to further improve performance and measurement of Facebook ad campaigns. The key difference between the pixel and CAPI is that the pixel is located on the browser level, while CAPI is located on the server level. This allows for site visitor data to be sent to your Facebook ad account from the website server level, which helps override ad blockers and Apple’s AppTrackingTransparency framework.
Facebook offers two methods in setting up Conversions API on your site. A manual method, which can be quite complicated for a developer. And also parter integration using one of Facebook’s parter platforms. For a full list of what these parter integrations are you can check out this Partner Integrations for Web help article provided by Facebook. Very recently at the time of writing this article, Facebook came out with a Google Tag Manager CAPI integration that utilizes Google Analytics 4 to help setup. If your website’s CRM is not listed as a parter, we recommend to use Tag Manager for less complexity and a more seamless experience.
Pro Tip: Use UTM Parameters & Google Analytics
In addition to utilizing event data inside of Facebook using the pixel and CAPI, we also strongly recommend the use of UTM parameters in your destination URLs. UTM parameters come baked into Facebook Ads Manager and are created at the ad level. These allow for greater visibility inside of your analytics platform attached to your website (Google Analytics, Shopify, Etc). For example, inside of Google Analytics, Traffic Acquisition, you can see a custom source, medium, and campaign level view. It would look something like this source= facebook-paid, medium= first-touch.

We recommend having this in place as well as the Facebook Pixel / Conversions API tracking to simply have another look at data that you can compare and contrast on. Additionally, you will gain a greater understanding of the user behavior on your site from the traffic driven by your Facebook ad campaigns. This is especially important with some Apple user data not being attributed to your ad campaigns.
A Clearer Picture On The Success Of Your Facebook Ad Campaigns
Using the tips, tricks, and tools that were discussed above we hope that you will find greater visibility into how your campaigns are performing. Which, in-turn will help you optimize campaigns to be sure you are getting in front of the right people, generating more leads, and create a higher ROAS. Harnessing the power of the Facebook Pixel, Conversions API, and using custom UTM parameters in your ads is the solution you’ve been looking for to gain a better understanding of what your ad spend is generating for your brand.
If you would like to talk to a member of our team about your Facebook ad campaigns, don’t hesitate to reach out to Jason@BlackTruckMedia.com